AWS Networking Crash Course
Categories:
Many times over, I have been left banging my head against a wall trying to fix some network connectivity issue in AWS. These instances follow a similar pattern: a few hours of confusion, followed by a brief moment of joy and illumination, before ultimately, a week or so later, I forget everything that I had just learned.
This time, I have decided to start putting down the nuances of networking on AWS, couched in simple terminology that can hopefully be understood by my future self. Time will tell.
1. VPC Basics
The Virtual Private Cloud (VPC) is a logically isolated network in the AWS Cloud, a walled garden of sorts. All of the networking-related resources that will be explored on this page exist within this walled garden, and, in one way or another, define the rules by which nodes (both inside and outside of the VPC) communicate with each other.
To create a VPC, the only piece of information we must provide is a CIDR block, which specifies the range of IP addresses that can be used by nodes within the VPC. CIDR notation is just a concise way of describing a range of IP addresses. A CIDR block consists of an IP Address and a prefix length, separated by “/”:
An IP Address is a 32-bit value, typically denoted as 4 8-bit values (i.e. values from 1 to 256) separated by “.” characters (e.g. 10.0.1.155).
CIDR notation can be understood as follows: Given an IP address \(a.b.c.d\) and a prefix length \(l\), the range of IP addresses defined by \(a.b.c.d\) / \(l\) includes all possible IP addresses whose first \(l\) bits are the same as the first \(l\) bits of \(a.b.c.d\).
When creating a VPC, it is recommended (though not strictly required) to choose from one of the predefined private IP address ranges as defined by RFC 1918.
Specifically, these ranges are:
- 10.0.0.0 - 10.255.255.255
- 172.16.0.0 - 172.31.255.255
- 192.168.0.0 - 192.168.255.255
Public and Private IPs
I will talk a lot about Public IP Addresses and Private IP Addresses throughout this page, so it is useful to distinguish between these up front.
Every website that we know and love has one or more Public IP Addresses. We can look up the IP Address of a website using the host command on MacOS or Linux:
$ host -t a github.com
github.com has address 20.29.134.23
This IP Address is considered public because anyone with an internet connection can access github.com using this address. For example, using Postman:
Public IP Addresses are thus unique across the entire internet, and are owned by a single entity. We can see more information about who owns a given IP Address with the whois command:
$ whois 20.29.134.23

OrgName:        Microsoft Corporation
OrgId:          MSFT
Address:        One Microsoft Way
City:           Redmond
StateProv:      WA
PostalCode:     98052
Country:        US
RegDate:        1998-07-10
Updated:        2023-11-17
Comment:        To report suspected security issues specific to traffic emanating from Microsoft online services, including the distribution of malicious content or other illicit or illegal material through a Microsoft online service, please submit reports to:
Comment:        * https://cert.microsoft.com.
Comment:
Comment:        For SPAM and other abuse issues, such as Microsoft Accounts, please contact:
Comment:        * abuse@microsoft.com.
Comment:
Comment:        To report security vulnerabilities in Microsoft products and services, please contact:
Comment:        * secure@microsoft.com.
Comment:
Comment:        For legal and law enforcement-related requests, please contact:
Comment:        * msndcc@microsoft.com
Comment:
Comment:        For routing, peering or DNS issues, please
Comment:        contact:
Comment:        * IOC@microsoft.com
Ref:            https://rdap.arin.net/registry/entity/MSFT
My MacBook similarly has an IP Address, which I can look up like so:
$ ipconfig getifaddr en0
192.168.4.48
This, however, is a Private IP Address, which means that it is not unique across the entire internet, and is instead only unique within my home WiFi network.
Creating a VPC
Throughout this page, we will use the AWS CDK in Python to configure and create our AWS Networking resources, starting from an empty CDK Stack class:
from aws_cdk import Stack, aws_ec2 as ec2
from constructs import Construct

class AwsNetworkingStack(Stack):

    def __init__(self, scope: Construct, id: str, **kwargs):
        super().__init__(scope, id, **kwargs)
Next, we will create a new VPC with the CIDR Block 10.0.0.0/24. Note that the examples will use the Level 1 (L1) CDK Constructs (i.e. those whose names begin with Cfn, such as CfnVpc). The higher level L2 Constructs are generally better suited for real-world apps, where abstracting away the boilerplate is a good thing; on this page, however, we want the boilerplate to be front and center.
We create an instance of CfnVpc within the Stack’s initializer to define the VPC:
vpc = ec2.CfnVPC(self, "MyVpc", cidr_block="10.0.0.0/24")
To deploy this Stack and create the VPC, we define a CDK entrypoint script like so:
import aws_cdk as cdk
from aws_networking.aws_networking_stack import AwsNetworkingStack

app = cdk.App()
AwsNetworkingStack(app, "AwsNetworkingStack")
app.synth()
And then deploy it by running the following commands:
cdk synth && cdk deploy AwsNetworkingStack
We can now see this VPC in the AWS Console
Each VPC exists within an AWS Region, a geographic location where AWS maintains its data centers. Each Region is further subdivided into multiple Availability Zones, with each Region containing at least 3 Availability Zones (AZs). Each AZ operates on independent power, cooling, and physical security, so that, by running an application in multiple AZs, customers can reduce the risk of a complete outage.
Subnets
Before we can create any nodes in our VPC, we need to create a Subnet. Every Subnet exists within a specific Availability Zone, and contains a subset of the IP Address range defined within the VPC.
For example, we could choose to divide our VPC into 3 subnets with the following CIDRs:
Nothing is stopping us from creating multiple subnets in a single Availability Zone; however, for the sake of simplicity (and to keep my diagrams from getting out of control 🙂), we will stick with one subnet per AZ.
The following CDK code creates the first of the three subnets with CIDR 10.0.0.0/25 in availability zone us-west-2a. The Name tag simply gives the subnet a friendly name when we view it in AWS Console, and is not strictly necessary.
subnet_a = ec2.CfnSubnet(
    self,
    id="SubnetA",
    cidr_block="10.0.0.0/25",
    vpc_id=vpc.ref,
    availability_zone="us-west-2a",
    tags=[{"key": "Name", "value": "Subnet A"}]
)
After creating all three subnets, we can check back in the AWS console to view the details of each subnet, including the number of available IP addresses:
Note that AWS reserves the first 4, and last 1 IP Addresses in each subnet, which is why, for example, there are only 123 IP Addresses available in Subnet A, instead of the full 128 addresses in the range 10.0.0.0 - 10.0.0.127.
Creating an EC2 Instance
Next, we will create an EC2 instance and place it within one of the VPC subnets. The CDK code below creates an EC2 instance called Instance A within Subnet A.
instance_a = ec2.CfnInstance(
    self,
    "InstanceA",
    image_id=ec2.MachineImage.lookup(
        name="ubuntu/images/hvm-ssd/ubuntu-jammy-22.04-amd64-server-20240207.1"
    ).get_image(self).image_id,
    instance_type="t3.nano",
    subnet_id=subnet_a.ref,
    tags=[{"key": "Name", "value": "Instance A"}],
)
When an EC2 instance is created within one of the VPC subnets, a Private IP Address is automatically assigned from the range of available IP Addresses in that subnet. For example, this instance in Subnet A was assigned the Private IP Address 10.0.0.83.
Because this instance only has a Private IP Address, there is no way for us to access it from outside the VPC. If we try to get information about this IP Address using whois, we will only see a remark indicating that this IP Address is reserved for private use:
$ whois 10.0.0.83
% IANA WHOIS server
% for more information on IANA, visit http://www.iana.org
% This query returned 1 object

inetnum:      10.0.0.0 - 10.255.255.255
organisation: IANA - Private Use
status:       RESERVED

remarks:      Reserved for Private-Use Networks [RFC1918].Complete
remarks:      registration details for 10.0.0.0/8 are found
remarks:      iniana-ipv4-special-registry.

changed:      1995-06
source:       IANA
So far, we have a VPC, three subnets, and an EC2 instance with a Private IP Address. At a high level, our setup now looks something like this, with a single instance in Subnet A, and with no connection between our VPC and the Internet:
In the next section, we will see how to get an instance in our VPC connected to the internet.
2. Connecting to the Internet
First, we will create a new EC2 Instance, this time specifying a Network Inferface with associate_public_ip_address=True. We will place this instance in Subnet B (just to mix things up), and will specify the name of an existing SSH Key Pair so that, once this instance is made accessible over the internet, we will be able to SSH into it from outside the VPC.
instance_b = ec2.CfnInstance(
    self,
    "InstanceB",
    image_id=ec2.MachineImage.lookup(
        name="ubuntu/images/hvm-ssd/ubuntu-jammy-22.04-amd64-server-20240207.1"
    ).get_image(self).image_id,
    instance_type="t3.nano",
    network_interfaces=[
        ec2.CfnInstance.NetworkInterfaceProperty(
            device_index="0",
            subnet_id=subnet_b.ref,
            associate_public_ip_address=True,
        )
    ],
    key_name="development",
    tags=[{"key": "Name", "value": "Instance B"}],
)
This new instance has both a Public and a Private IP Address:
If we pass the public IP Address to the whois command, we should see, as expected, that this IP Address is owned by Amazon:
$  whois 35.89.249.122
% IANA WHOIS server
% for more information on IANA, visit http://www.iana.org
% This query returned 1 object

refer:        whois.arin.net

inetnum:      35.0.0.0 - 35.255.255.255
organisation: Administered by ARIN
status:       LEGACY

whois:        whois.arin.net

changed:      1994-04
source:       IANA

# whois.arin.net

NetRange:       35.71.64.0 - 35.95.255.255
CIDR:           35.71.128.0/17, 35.80.0.0/12, 35.72.0.0/13, 35.71.64.0/18
NetName:        AT-88-Z
NetHandle:      NET-35-71-64-0-1
Parent:         NET35 (NET-35-0-0-0-0)
NetType:        Direct Allocation
OriginAS:
Organization:   Amazon Technologies Inc. (AT-88-Z)
RegDate:        2019-04-15
Updated:        2024-02-01
Ref:            https://rdap.arin.net/registry/ip/35.71.64.0
Now that our instance has a public IP Address, let’s try connecting to it via SSH!
$ ssh -i development.pem -o ConnectTimeout=10 ubuntu@35.89.249.122
ssh: connect to host 35.89.249.122 port 22: Operation timed out
Despite having its own public IP Address, this instance is not accessible over the internet. This is because there is still no connection between our VPC and the internet. To set up this connection, we need to create an Internet Gateway.
Internet Gateways and Route Tables
The Internet Gateway is one of the more hand-wavy resources in the AWS Networking landscape. We don’t configure the Internet Gateway in any way; we simply create it and attach it to our VPC to enable inbound and outbound traffic between the VPC and the Internet.
# Create an Internet Gateway
internet_gateway = ec2.CfnInternetGateway(
    self, "InternetGateway", tags=[{"key": "Name", "value": "Internet Gateway"}]
)

# Attach the Internet Gateway to the VPC
gateway_attachment = ec2.CfnVPCGatewayAttachment(
    self,
    "GatewayAttachment",
    vpc_id=vpc.ref,
    internet_gateway_id=internet_gateway.ref,
)
Next, we need to configure a Route Table to direct traffic from our subnet through the newly created Internet Gateway. A Route Table is a list of routing rules that are applied to traffic within a Subnet.
By default, each Subnet is associated with a Route Table containing a single routing rule that enables local communication within the VPC. We can view this Route Table in the AWS Console:
We will create a new Route Table with an additional routing rule to direct all traffic (defined by the IP Address Range 0.0.0.0/0) through the Internet Gateway.
internet_route_table = ec2.CfnRouteTable(
    self,
    "InternetRouteTable",
    vpc_id=vpc.ref,
    tags=[{"key": "Name", "value": "Internet Route Table"}],
)

route = ec2.CfnRoute(
    self,
    "Route",
    route_table_id=internet_route_table.ref,
    destination_cidr_block="0.0.0.0/0",
    gateway_id=internet_gateway.ref
)
Route Tables with multiple routes use the most specific route that matches the destination IP Address. This means that, even though we have specified a route that directs all traffic through the Internet Gateway, the default local route will still be used for traffic within the VPC. We associate this new Route Table with Subnet B via CDK like so:
internet_route_table_association = ec2.CfnSubnetRouteTableAssociation(
    self,
    "InternetRouteTableAssociation",
    route_table_id=internet_route_table.ref,
    subnet_id=subnet_b.ref,
)
On a side note, some AWS Documentation will use the term Public Subnet to refer to subnet that is associated with a Route Table which directs traffic through an Internet Gateway; while the term Private Subnet refers to a subnet with no connection to an Internet Gateway. By these definitions, our Subnet B is a Public Subnet, while our other two Subnets are Private Subnets.
Security Groups
By creating an Internet Gateway and associating it with a Route Table, we have enabled connectivity between one of the Subnets (namely, Subnet B) and the Internet; however, just because traffic from the Internet can reach the instance on our Subnet, this does not mean that all traffic necessarily should reach our instance.
For example, we may want to only allow traffic from a trusted range of IP addresses outside the VPC, or we may want to allow incoming traffic only on a specific port. There are two resources in the AWS Networking Stack that are used to conditionally restrict and allow traffic in this way: Network ACLs and Security Groups.
Network ACLs and Security Groups basically do the same thing but at different levels of granularity. Network ACLs allow us to restrict or allow traffic at the Subnet level, whereas Security Groups allow us to restrict or allow traffic at the individual EC2 instance level.
Each VPC starts with the default Network ACL shown below, which allows all inbound and outbound traffic (we can see also from this screenshot that the default Network ACL is associated with all three Subnets in the VPC):
Likewide, every VPC has a default Security Group. This Security Group, however, is more strict than the default Network ACL, as it only allows traffic from other instances in the same Security Group, which means that we are still unable to SSH into Instance B even after creating the Internet Gateway.
Here is a look at the default Security Group in the AWS Console:
Let’s create a new Security Group which permits us to SSH into the instance by specifying an Inbound Rule that allows traffic on port 22 (the port used by SSH).
ssh_security_group = ec2.CfnSecurityGroup(
    self,
    "SSHSecurityGroup",
    vpc_id=vpc.ref,
    group_description="Allow SSH traffic",
    security_group_ingress=[
        ec2.CfnSecurityGroup.IngressProperty(
            ip_protocol="tcp",
            from_port=22,
            to_port=22,
            cidr_ip="0.0.0.0/0"
        )
    ],
    tags=[{"key": "Name", "value": "SSH Security Group"}],
)
Finally, we will update the code that creates Instance B to use the newly created Security Group. Note that an EC2 instance can belong to multiple security groups:
instance_b = ec2.CfnInstance(
    self,
    "InstanceB",
    image_id=ec2.MachineImage.lookup(
        name="ubuntu/images/hvm-ssd/ubuntu-jammy-22.04-amd64-server-20240207.1"
    ).get_image(self).image_id,
    key_name="development",
    instance_type="t3.nano",
    network_interfaces=[
        ec2.CfnInstance.NetworkInterfaceProperty(
            device_index="0",
            subnet_id=subnet_b.ref,
            associate_public_ip_address=True,
            group_set=[ssh_security_group.ref, vpc.attr_default_security_group]
        )
    ],
    tags=[{"key": "Name", "value": "Instance B"}],
)
If we check back on our EC2 instance in the console and select the Security tab, we will see that this instance is using the SSH Security Group, and has an Inbound Rule that allows traffic to port 22.
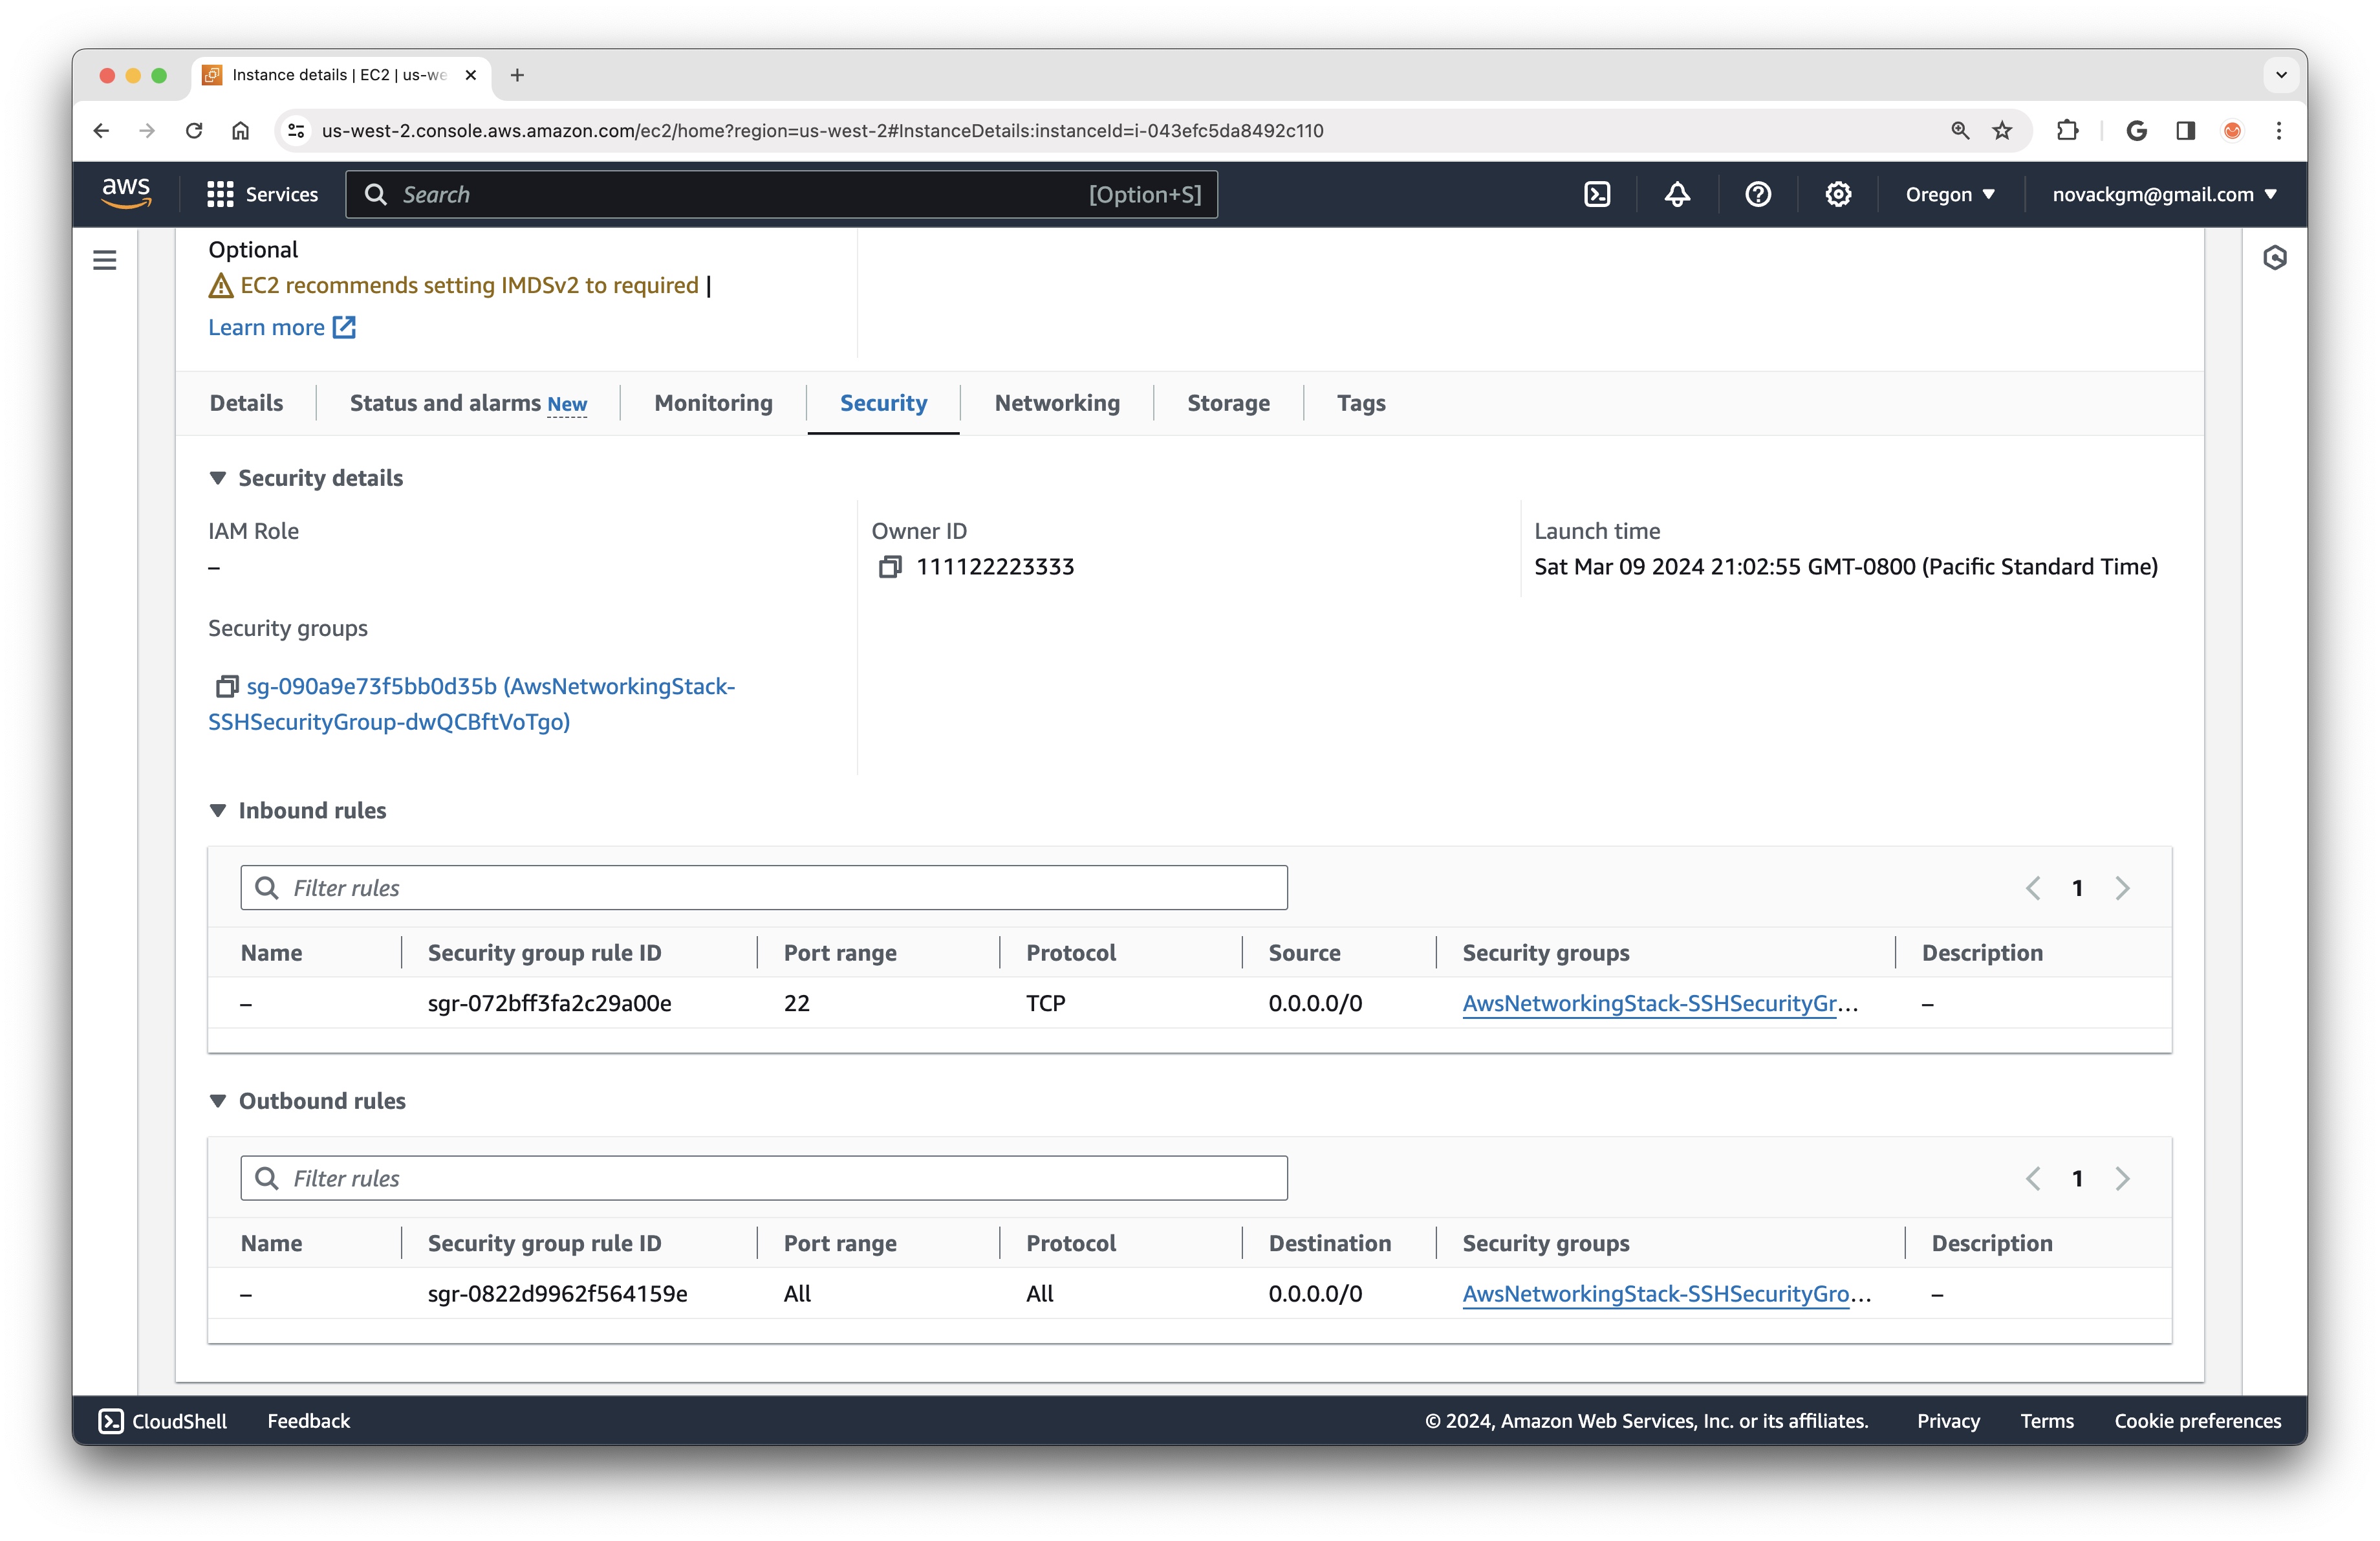
More importantly, we will at last be able to SSH into this instance using the SSH Key Pair specified when creating the instance:
$ ssh -i development.pem ubuntu@35.89.249.122
Welcome to Ubuntu 22.04.3 LTS (GNU/Linux 6.2.0-1017-aws x86_64)

ubuntu@ip-10-0-0-168:~$
With SSH enabled, we will now be able to start exploring the world through the eyes of an EC2 instance running in a VPC. Here is the full picture of our VPC setup after Part 2:
3. Communication within a VPC
We ended the last part by successfully connecting via SSH to an instance running on Subnet B within the VPC. In this part, we will start to play around with intra-VPC communication to see how the different resources are involved.
Recall that the first EC2 instance we created, Instance A, was created without a public IP address, and was thus inaccessible to us. Now that we can connect to Instance B via SSH, we will be able to communicate with other instances within the VPC using their Private IP addresses.
For example, while SSH’d into Instance B, we can ping Instance A using its Private IP address, 10.0.0.83:
ubuntu@ip-10-0-0-168:~$ ping -c 5 10.0.0.83
PING 10.0.0.83 (10.0.0.83) 56(84) bytes of data.
64 bytes from 10.0.0.83: icmp_seq=1 ttl=64 time=0.784 ms
64 bytes from 10.0.0.83: icmp_seq=2 ttl=64 time=0.801 ms
64 bytes from 10.0.0.83: icmp_seq=3 ttl=64 time=0.852 ms
64 bytes from 10.0.0.83: icmp_seq=4 ttl=64 time=0.863 ms
64 bytes from 10.0.0.83: icmp_seq=5 ttl=64 time=0.836 ms

--- 10.0.0.83 ping statistics ---
5 packets transmitted, 5 received, 0% packet loss, time 4102ms
rtt min/avg/max/mdev = 0.784/0.827/0.863/0.030 ms
This pattern of connecting indirectly to an instance on a Private Subnet – via an instance on a Public Subnet in the same VPC – is a useful way to get access to resources on a Private Subnet. In this scenario, you might see the Public Subnet instance (Instance B in our case) referred to as a Bastion Host.
Connecting to a Private Web Server
In some cases, interacting with resources via a remote SSH session on a Bastion Host is not ideal. For example, if we are working with a web service that runs in a Private Subnet, it is helpful to be able to interact with this service using familiar tools like Postman or a web browser, rather than, for example, simply running curl commands from a remote SSH session.
Let’s see how we get a local web browser connected to a service running within a Private Subnet.
First, we will start a web server on Instance A that serves a simple HTML page. To do this, we will terminate the instance, and then recreate it with the User Data script shown below, which will be executed when the instance starts up:
#!/bin/bash
echo "<html><body><h1>Hello from Instance A</h1></body></html>" > index.html
nohup python3 -m http.server 8000 &
Here is the Python CDK code used to create the User Data script for Instance A:
instance_a_startup_script = ec2.UserData.for_linux(shebang="#!/bin/bash")
instance_a_startup_script.add_commands(
    'echo "<html><body><h1>Hello from Instance A</h1></body></html>" > index.html',
    'nohup python3 -m http.server 8000 &'
)
instance_a.user_data = aws_cdk.Fn.base64(instance_a_startup_script.render())
We can test that the web server is up and running by executing a curl command from Instance B, using the Private IP Address of Instance A. Note that the new Instance A will most likely be assigned a different private IP Address when it is created.
ubuntu@ip-10-0-0-168:~$ curl 10.0.0.83:8000
<html><body><h1>Hello from Instance A</h1></body></html>
To allow a local web browser to hit Instance A’s web server, we can use the -L option of SSH to open a tunnel through Instance B which binds a port on the local machine to port 8000 on Instance A.
The exact command will look like this:
ssh -i development.pem -N -L 8080:10.0.0.83:8000 ubuntu@35.89.249.122
There are a lot of different port numbers and IP addresses here, but essentially what this command does is set up an SSH tunnel such that all requests to port 8080 on localhost are sent via SSH to the host ubuntu@35.89.249.122, which then forwards these requests to port 8000 on the host 10.0.0.83.
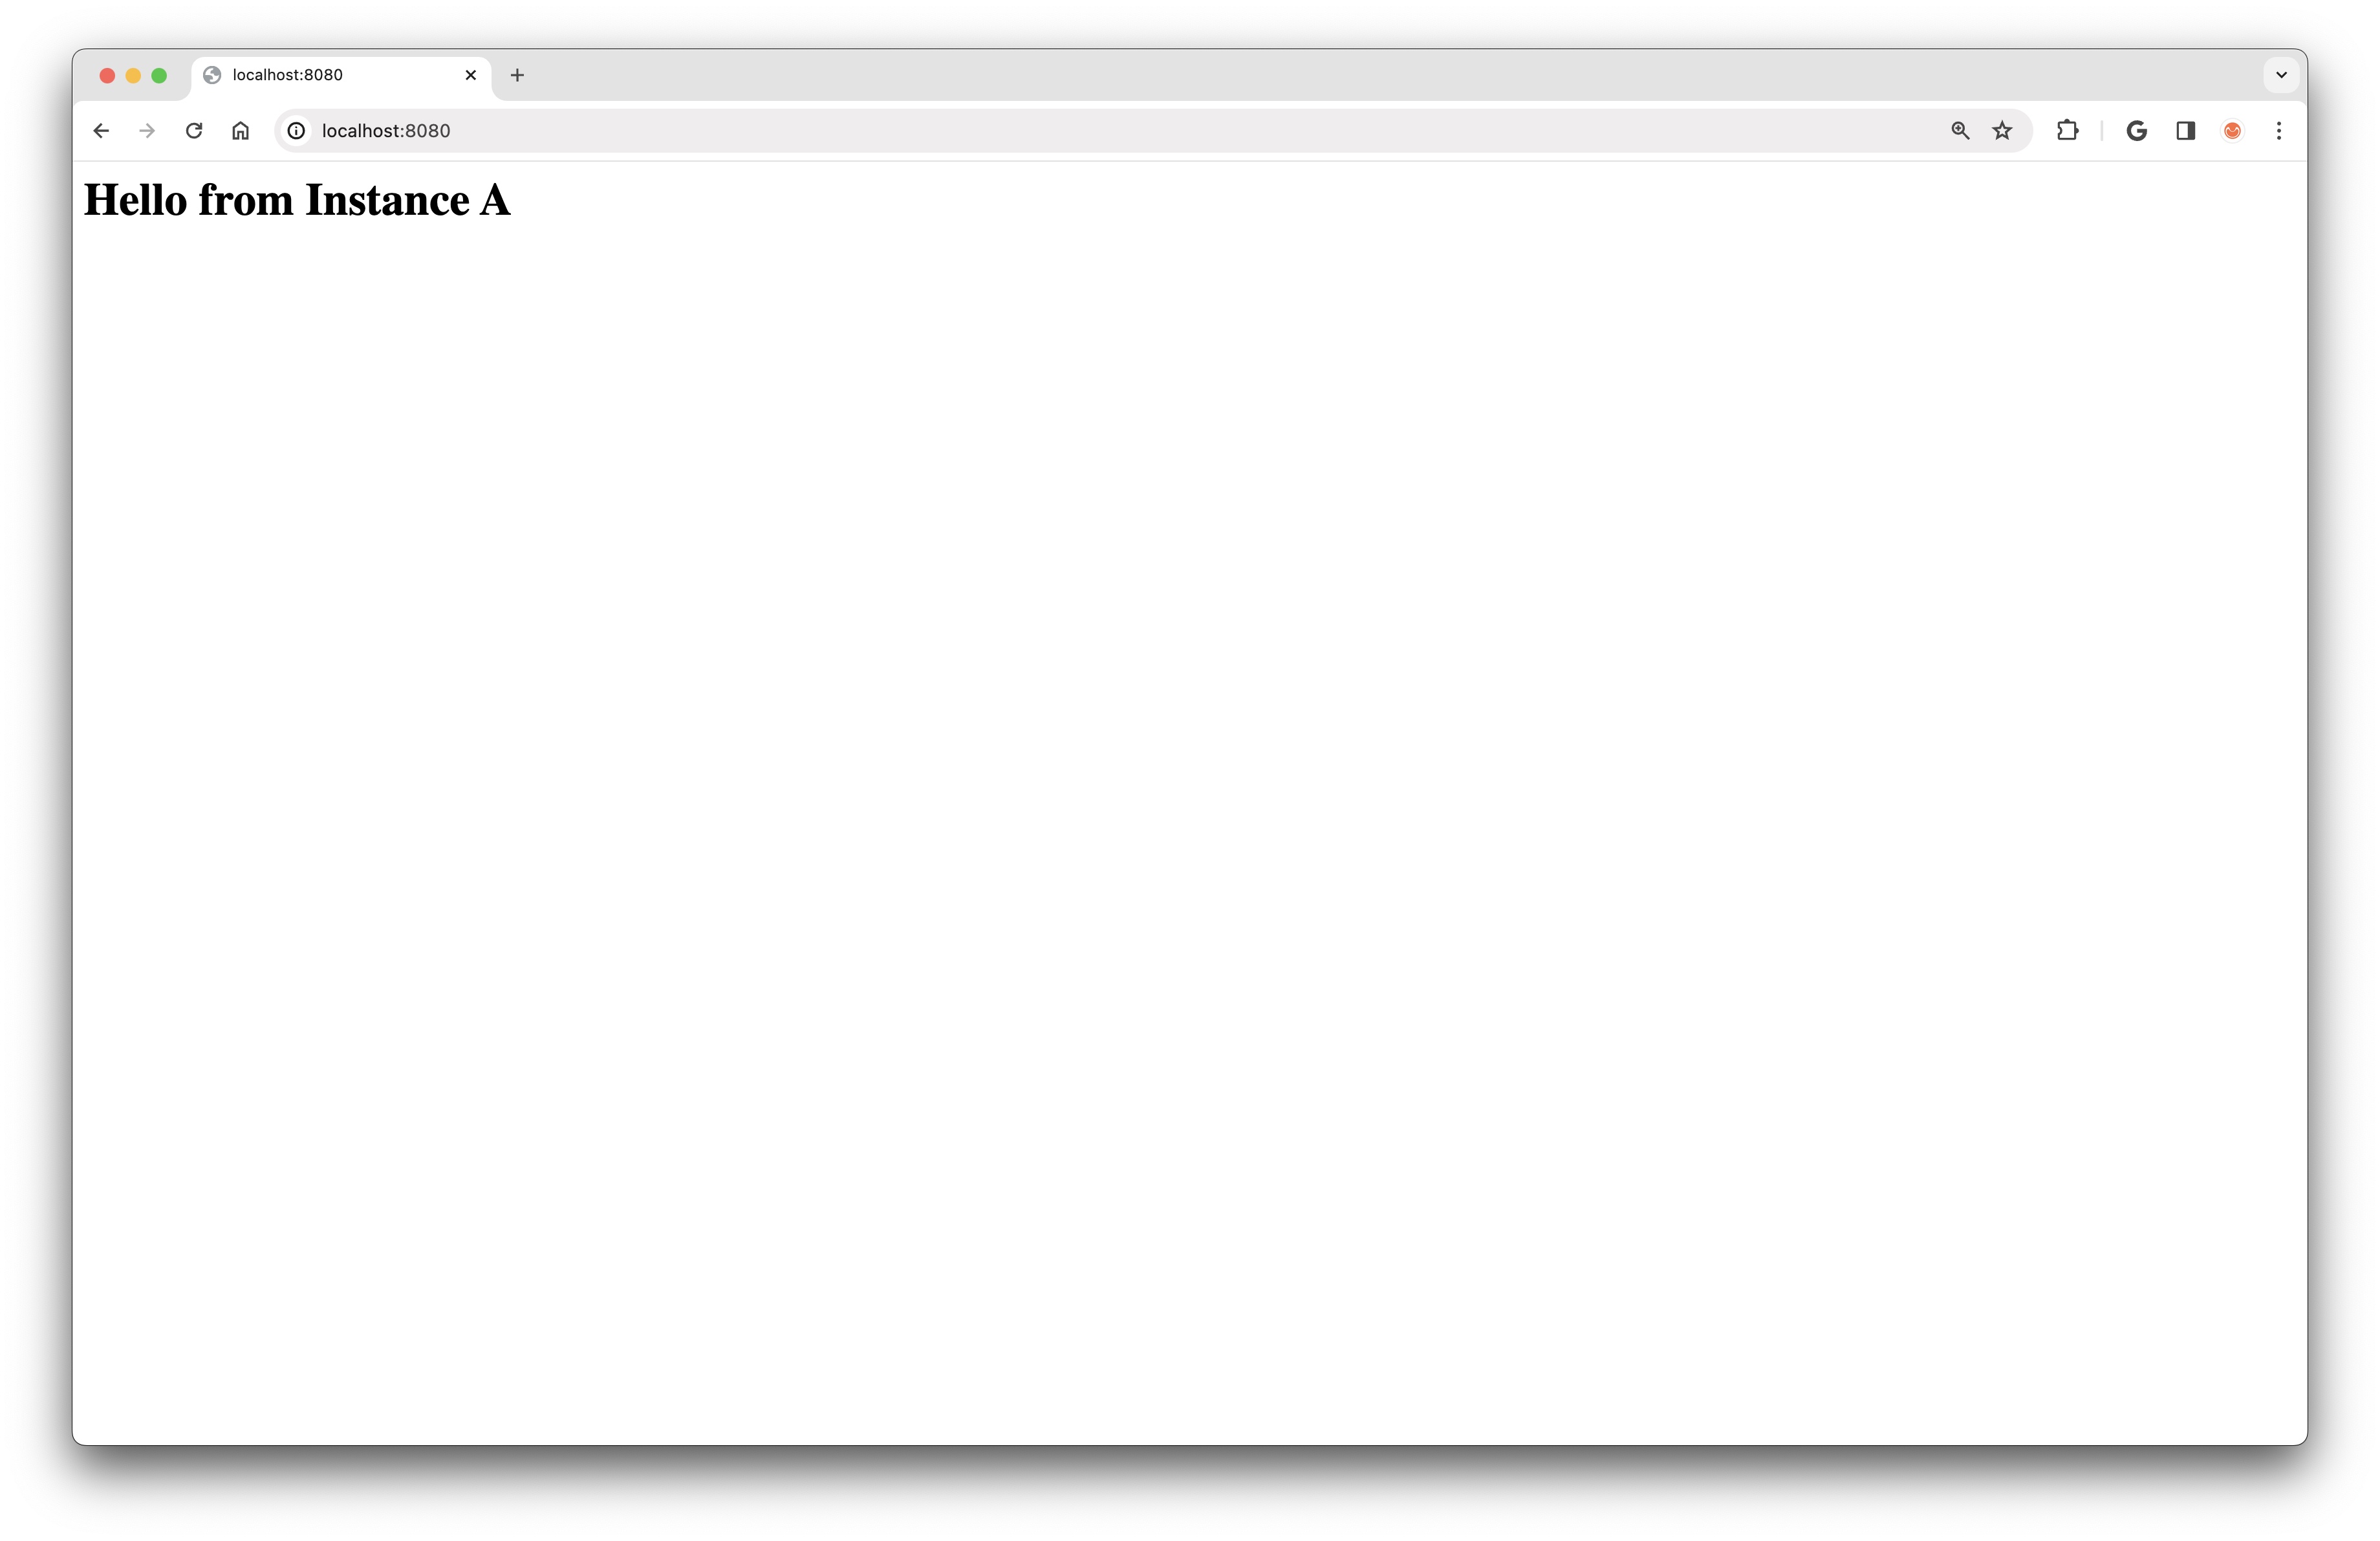
With this SSH tunnel created, we can navigate to localhost:8080 in a browser to see the web page hosted in Instance A:
NAT Gateways and Elastic IPs
We saw before how an Internet Gateway enables inbound and outbound communication between instances in a Public Subnet and the Internet. There are also cases where we might want to allow an instance in a Private Subnet to connect to the Internet, while still keeping it inaccessible from outside the VPC; or, in other words, where we want to enable outbound traffic to the Internet, but not inbound traffic from the Internet.
As a very contrived example, imagine that we want our private web server to query a public API for weather data when it starts up, and then display this data in the static HTML page that it serves. We will modify the user data script that starts the server to first fetch the temperature in Seattle using the weather.gov API:
#!/bin/bash
apt-get install -y jq
TEMPERATURE=$(curl -s https://api.weather.gov/gridpoints/SEW/125,65/forecast | jq -r '.properties.periods[0].temperature')
echo "<html><body><h1>Hello from Instance A. The temperature in Seattle is $TEMPERATURE</h1></body></html>" > index.html
nohup python3 -m http.server 8000 &
If we recreate Instance A and then open the web page in a browser via SSH tunneling as demonstrated above, we will find that the temperature value is not displayed in the HTML:
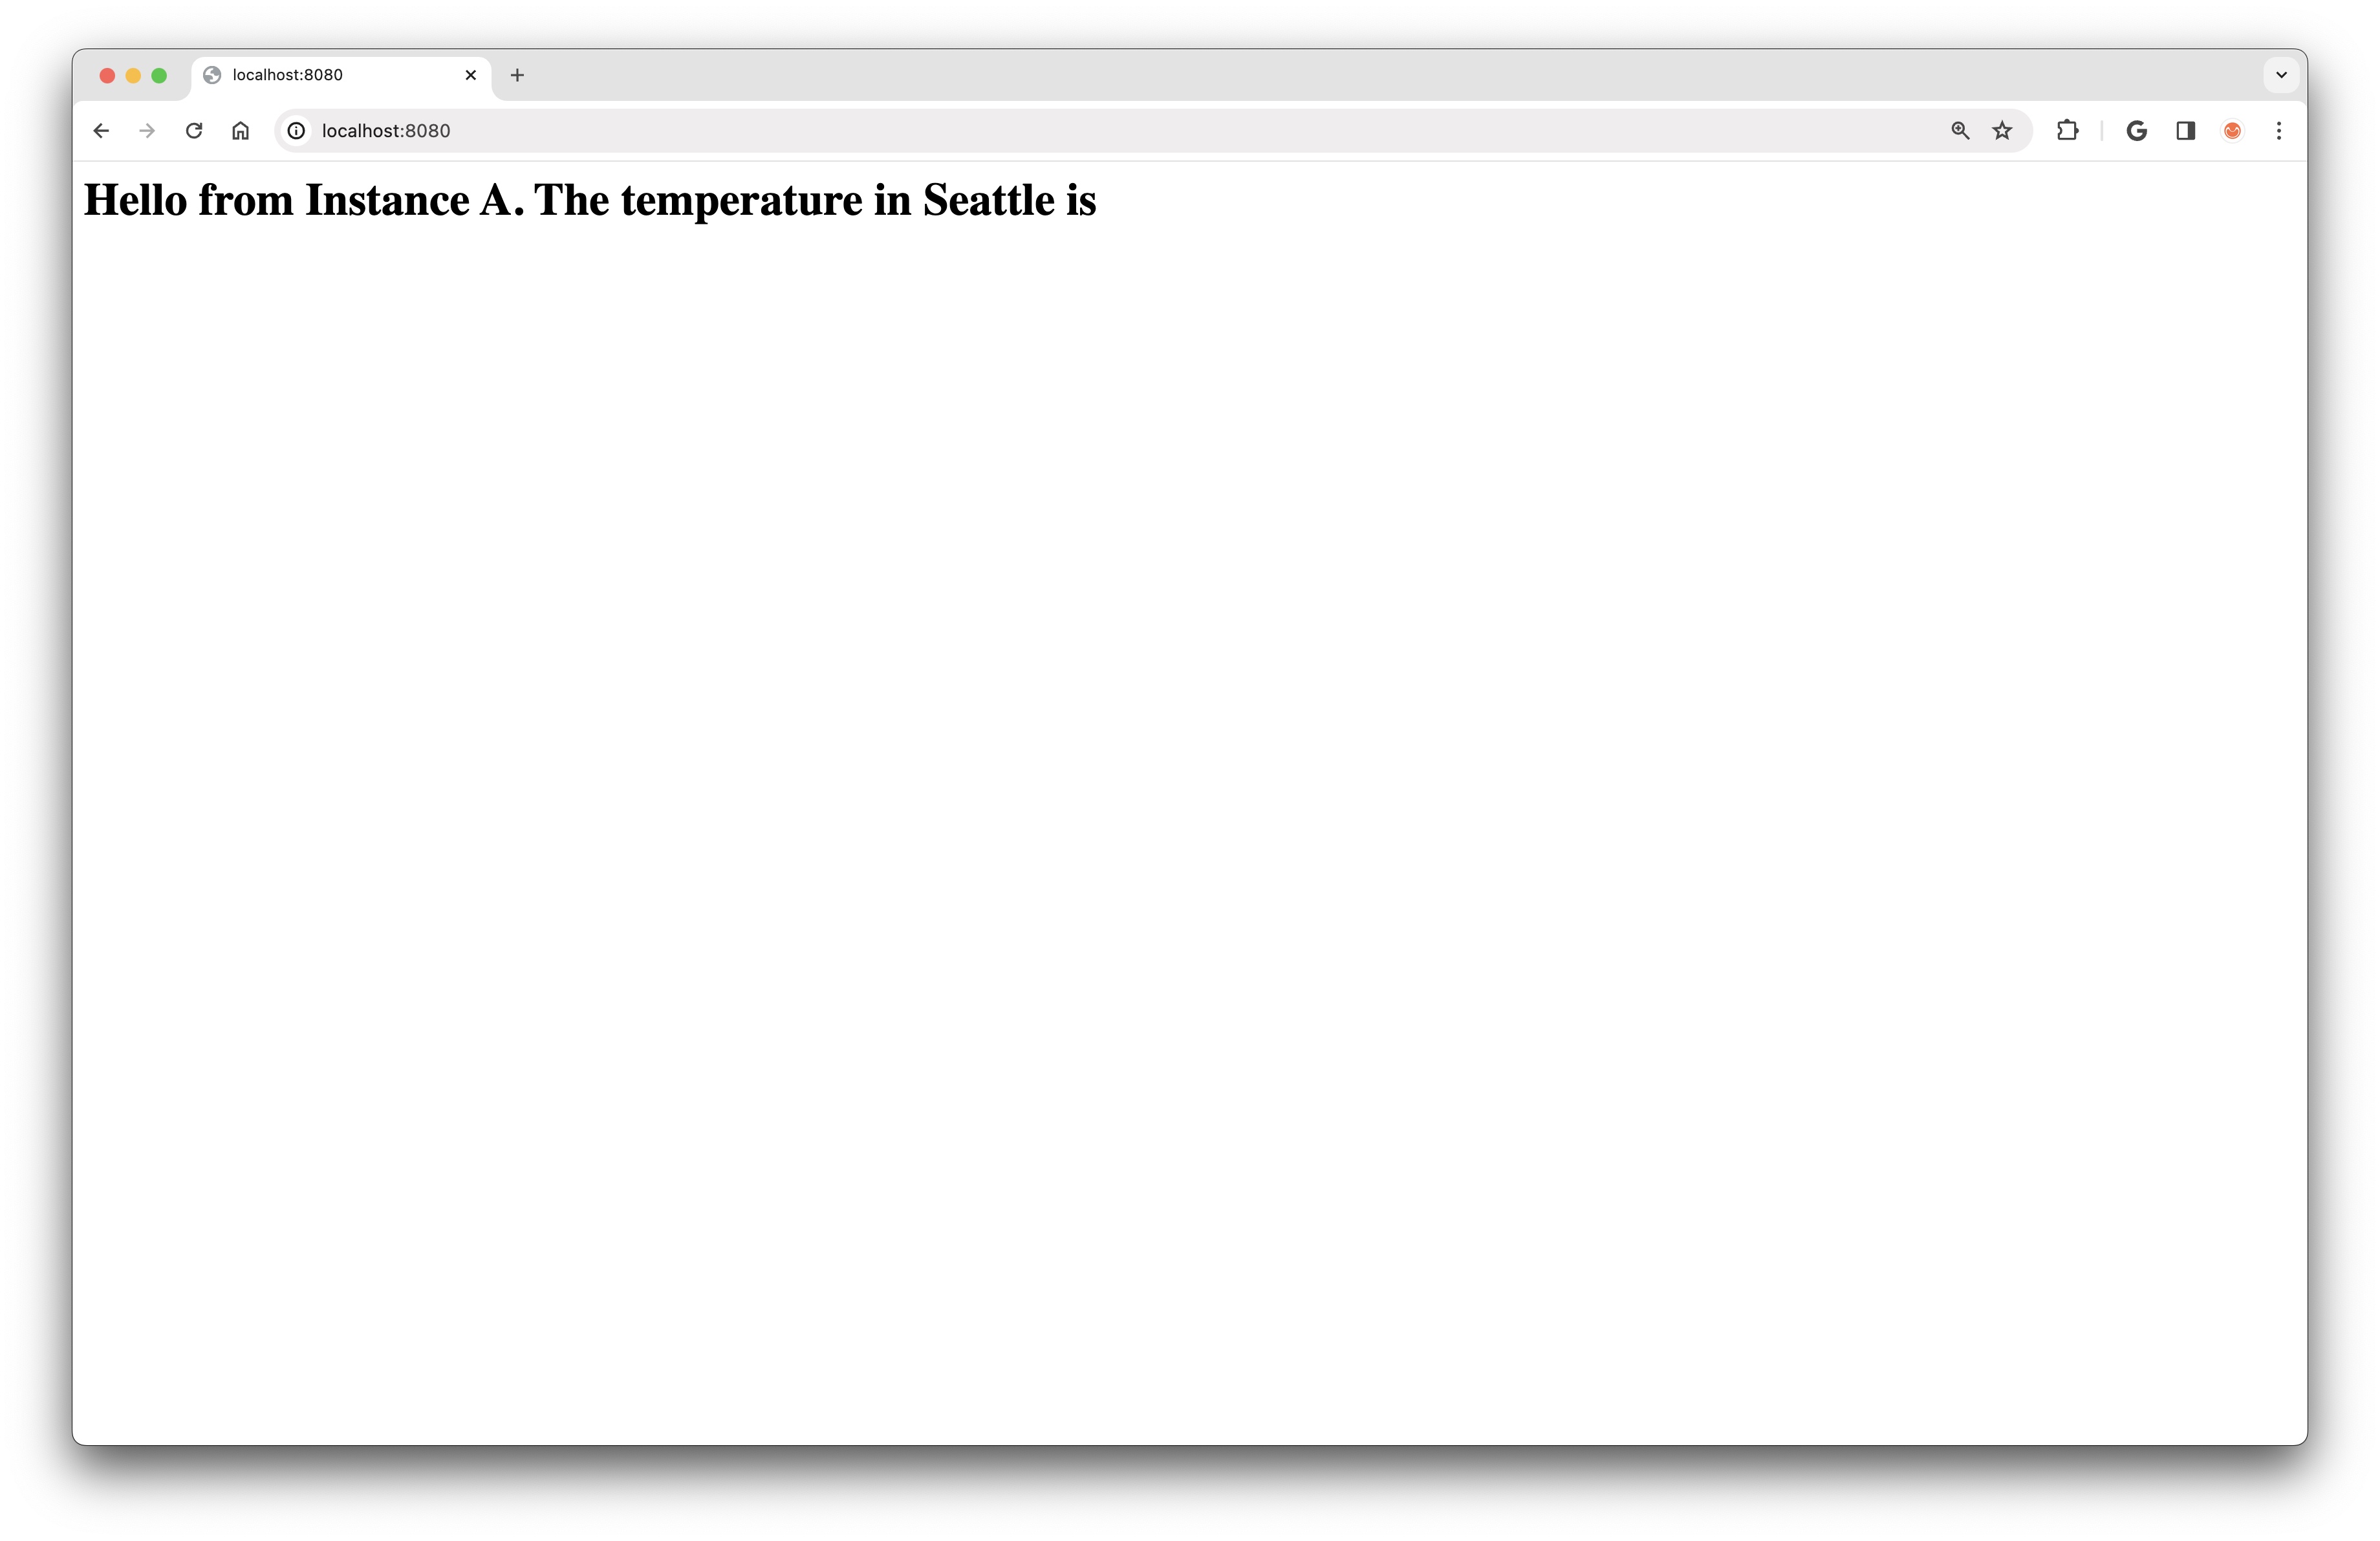
This is as expected. Because Instance A is running in a Private Subnet, it has no way to connect to the Internet. To enable outbound-only Internet communication from a Private Subnet, we can use a NAT Gateway.
Before we see how to create and configure a NAT Gateway, however, we need to take a quick detour to discuss Elastic IP Addresses on AWS. Earlier, when we created our Public Subnet EC2 Instance, Instance B, we allowed AWS to assign any one of its available Public IP Addresses. A consequence of this is that, if we were to terminate Instance B and then create it again, it would almost certainly be assigned a different Public IP Address from the one it had previously.
As an alternative to this dynamic assignment of Public IP Addresses, AWS offers us the option to reserve – and pay for – static Public IP Addresses. These static addresses are called (perhaps a bit confusingly) Elastic IP Addresses.
We will need an Elastic IP Address in order to create a NAT Gateway, so we will create one by in our CDK Stack:
natgateway_elastic_ip = ec2.CfnEIP(
    self,
    "NatGatewayIP",
    domain="vpc",
    tags=[{"key": "Name", "value": "NAT Gateway IP"}],
)
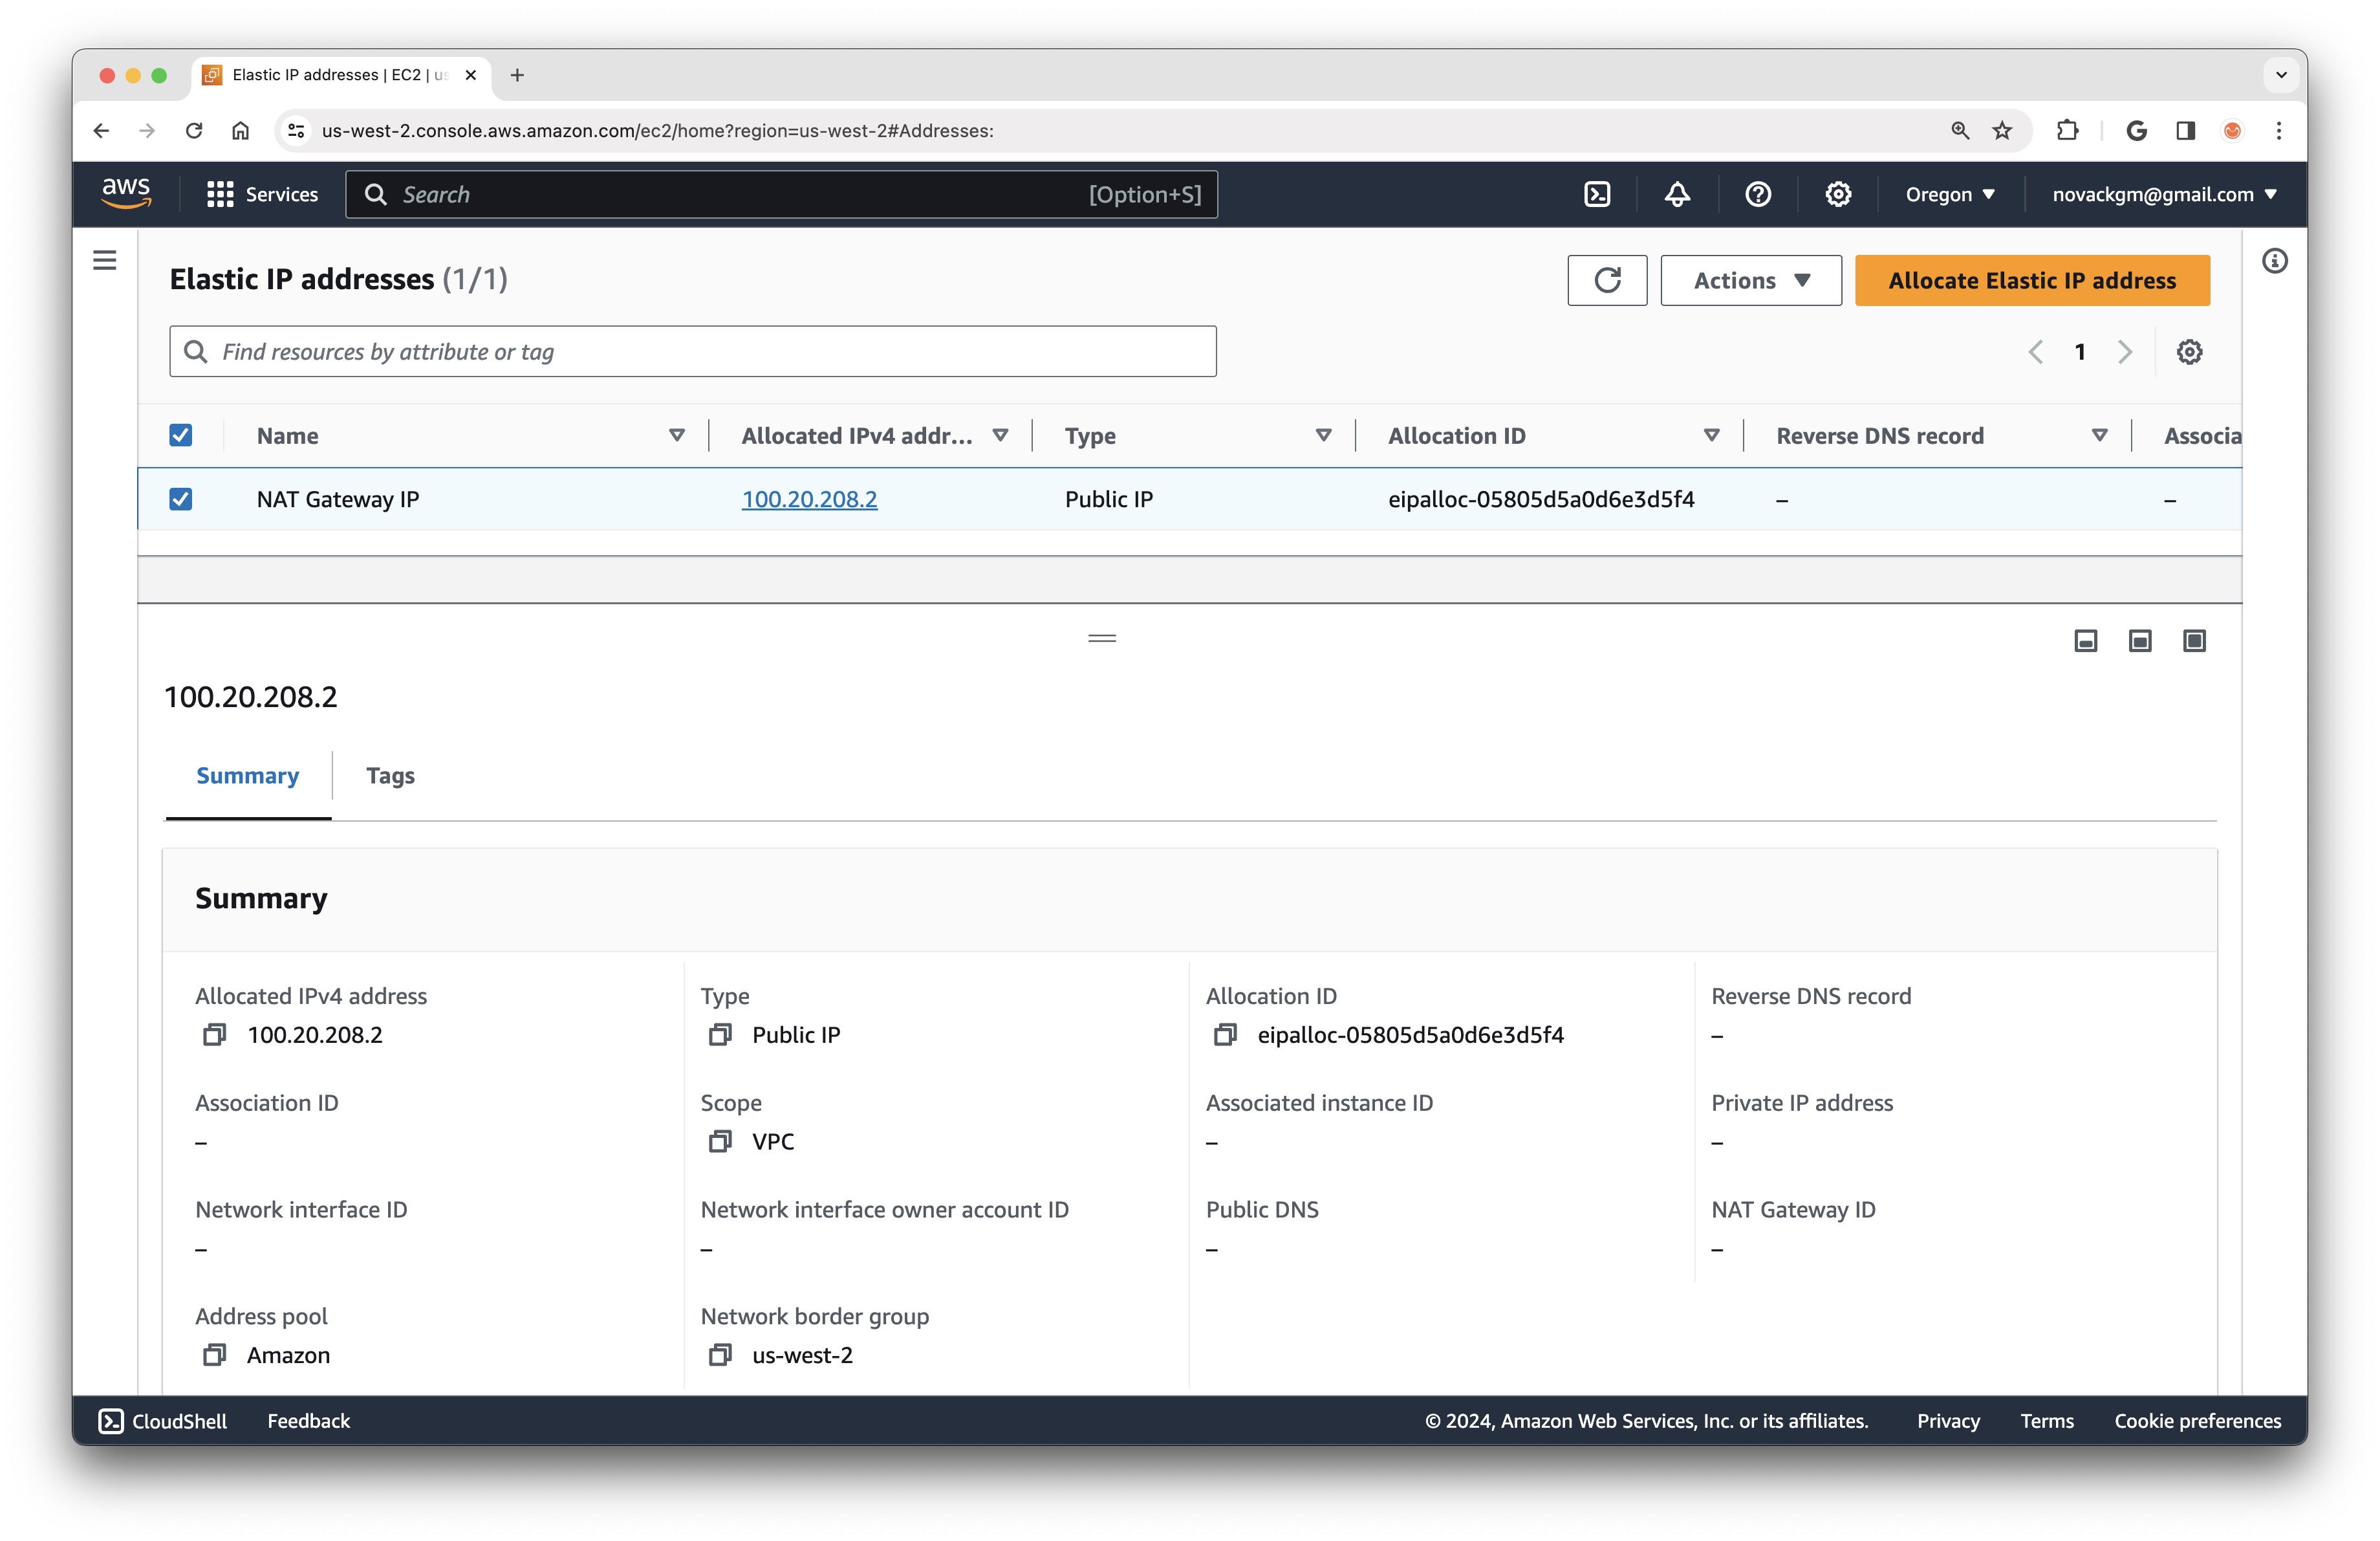
In the AWS Console under Elastic IPs, we can see that the Elastic IP has been created and has an associated public IP address (in my case, 100.20.208.2):
Next, we will create a NAT Gateway in our Public Subnet, using the newly created Elastic IP Address:
nat_gateway = ec2.CfnNatGateway(
    self,
    "NatGateway",
    allocation_id=natgateway_elastic_ip.attr_allocation_id,
    subnet_id=subnet_b.ref,
    tags=[{"key": "Name", "value": "NAT Gateway"}],
)
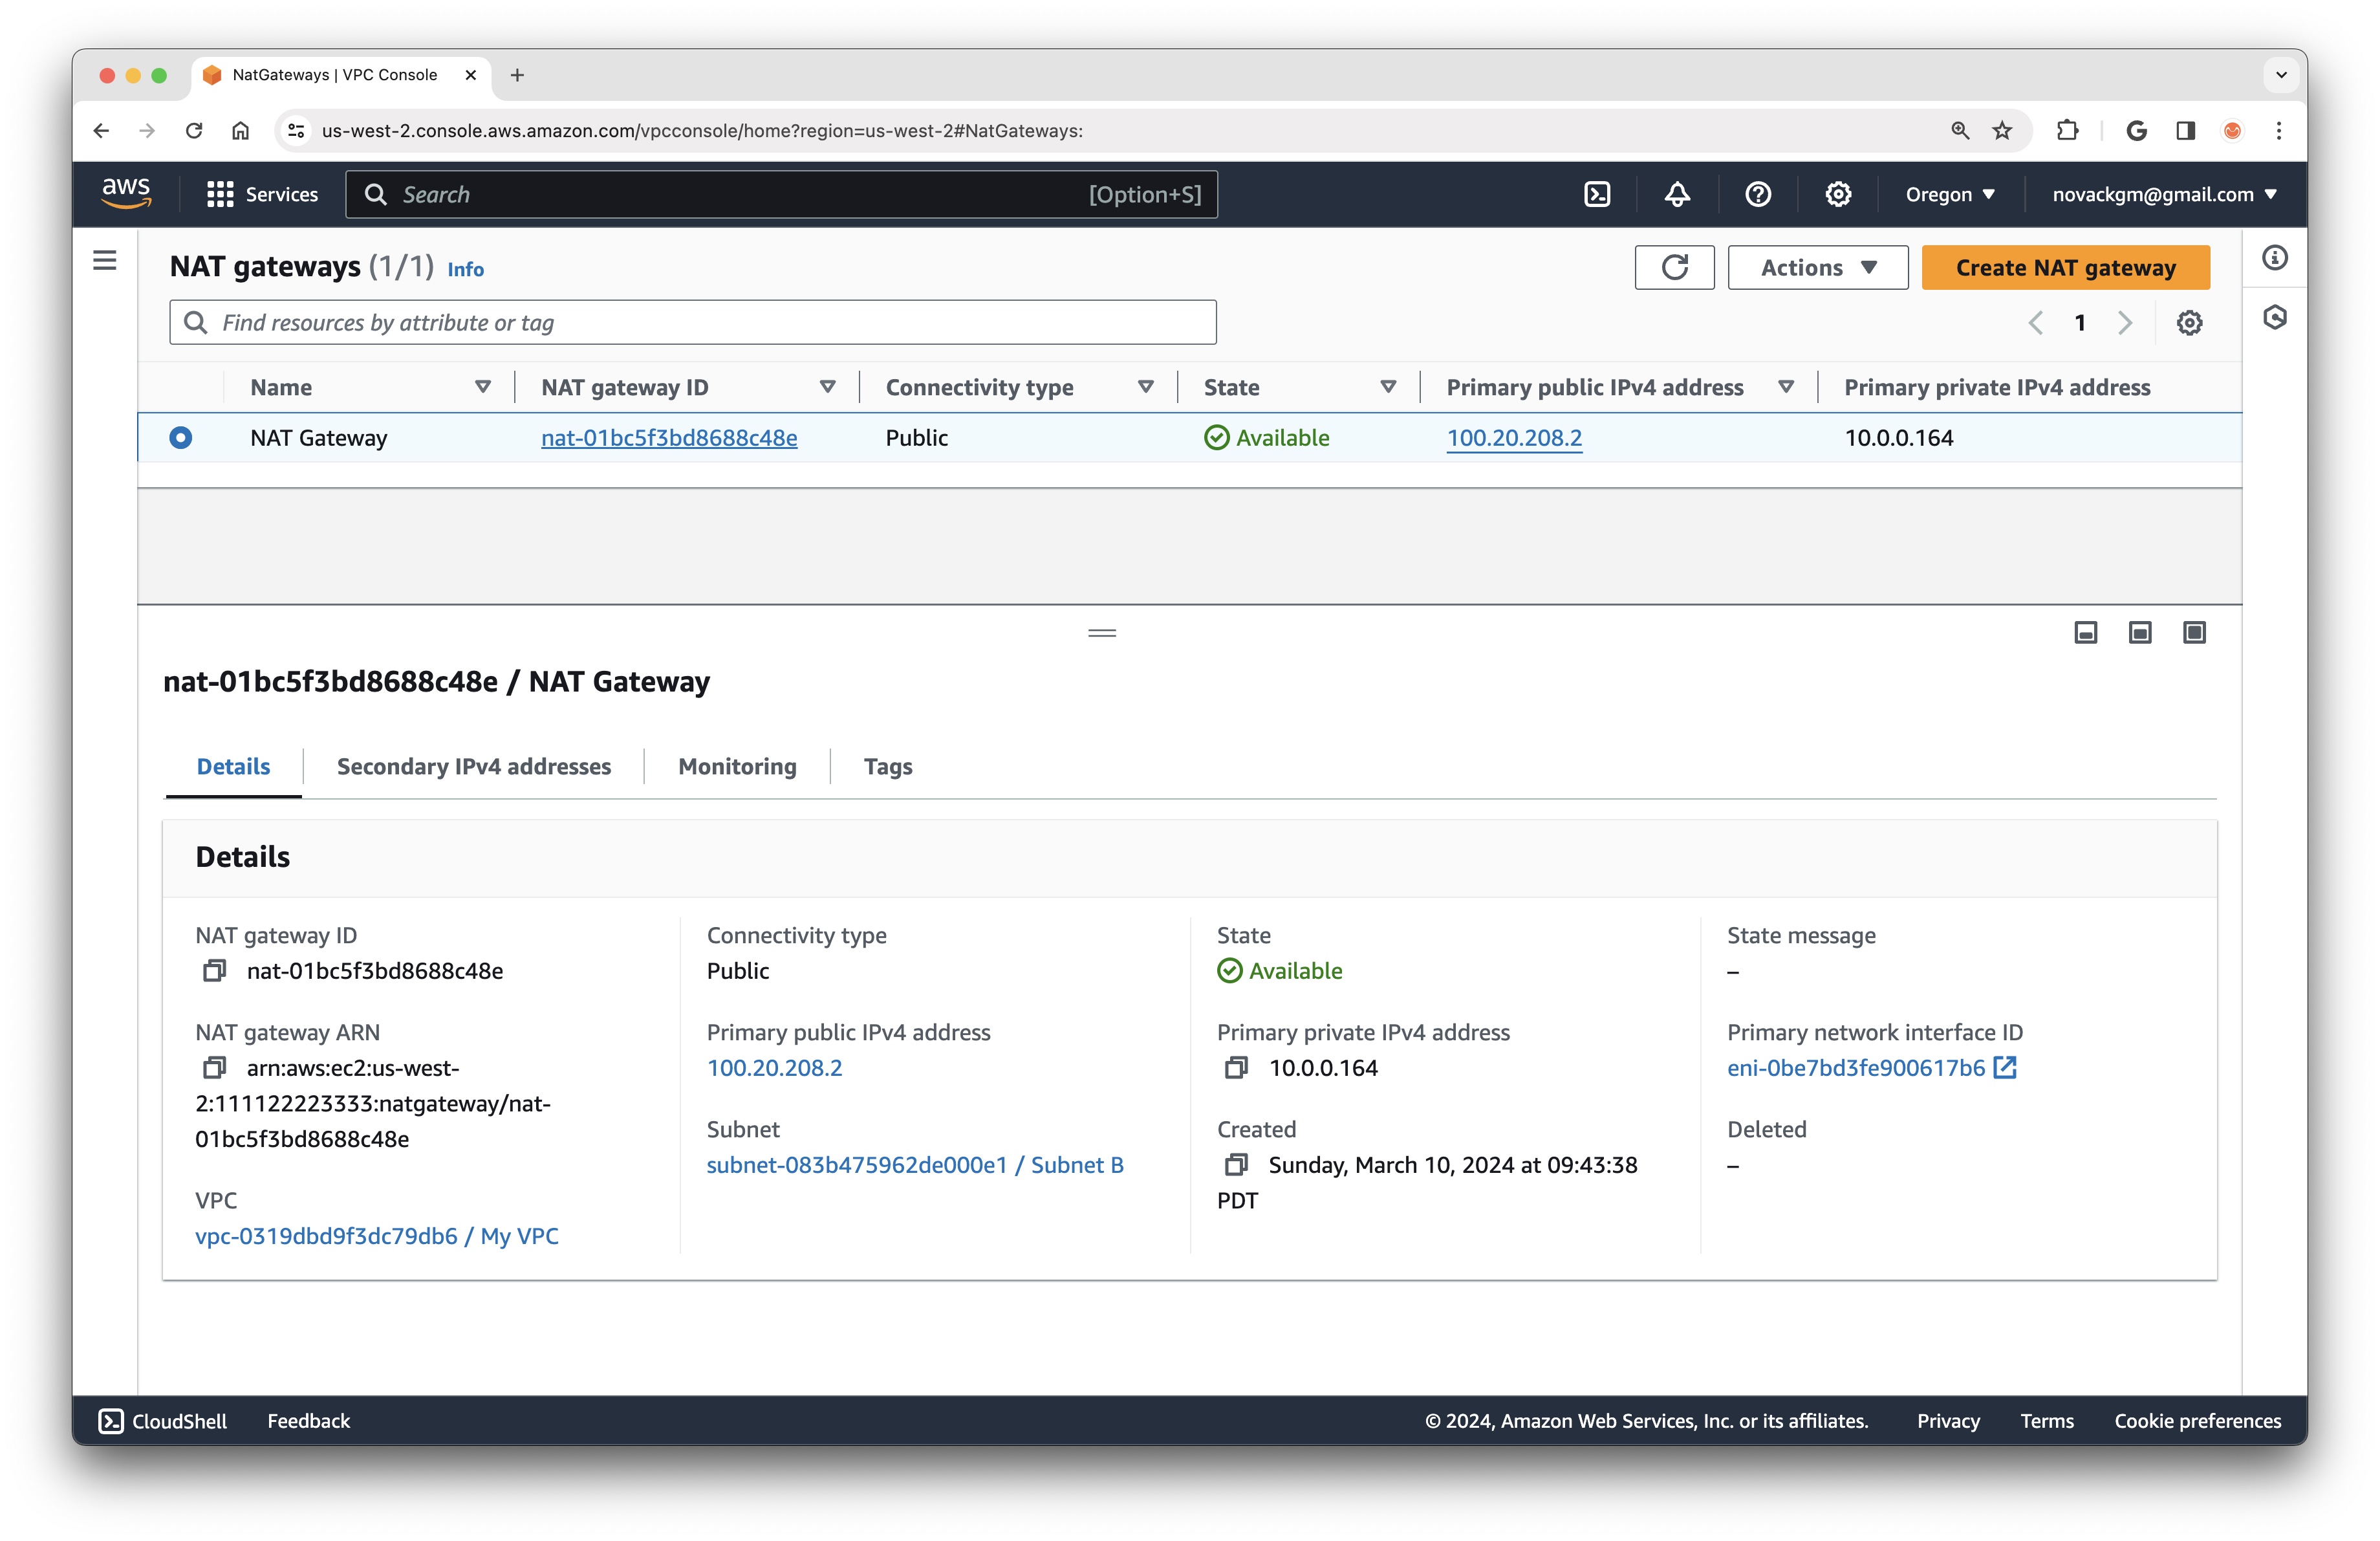
If we look at the new NAT Gateway in the console, we will see that its Public IP Address is the same as that of the Elastic IP created earlier.
To get instances in our Private Subnet to start sending traffic through the NAT Gateway, we will need to create a new Route Table with a routing rule that directs all outbound traffic to the NAT Gateway. This is very similar to what we did earlier with Subnet B and the Internet Gateway:
nat_gateway_route_table = ec2.CfnRouteTable(
    self,
    "NatGatewayRouteTable",
    vpc_id=vpc.ref,
    tags=[{"key": "Name", "value": "Nat Gateway Route Table"}],
)
nat_gateway_route = ec2.CfnRoute(
    self,
    "NatGatewayRoute",
    route_table_id=nat_gateway_route_table.ref,
    destination_cidr_block="0.0.0.0/0"
)
nat_gateway_route.gateway_id = nat_gateway.ref

nat_gateway_route_table_association = ec2.CfnSubnetRouteTableAssociation(
    self,
    "NatGatewayRouteTableAssociation",
    route_table_id=nat_gateway_route_table.ref,
    subnet_id=subnet_a.ref,
)
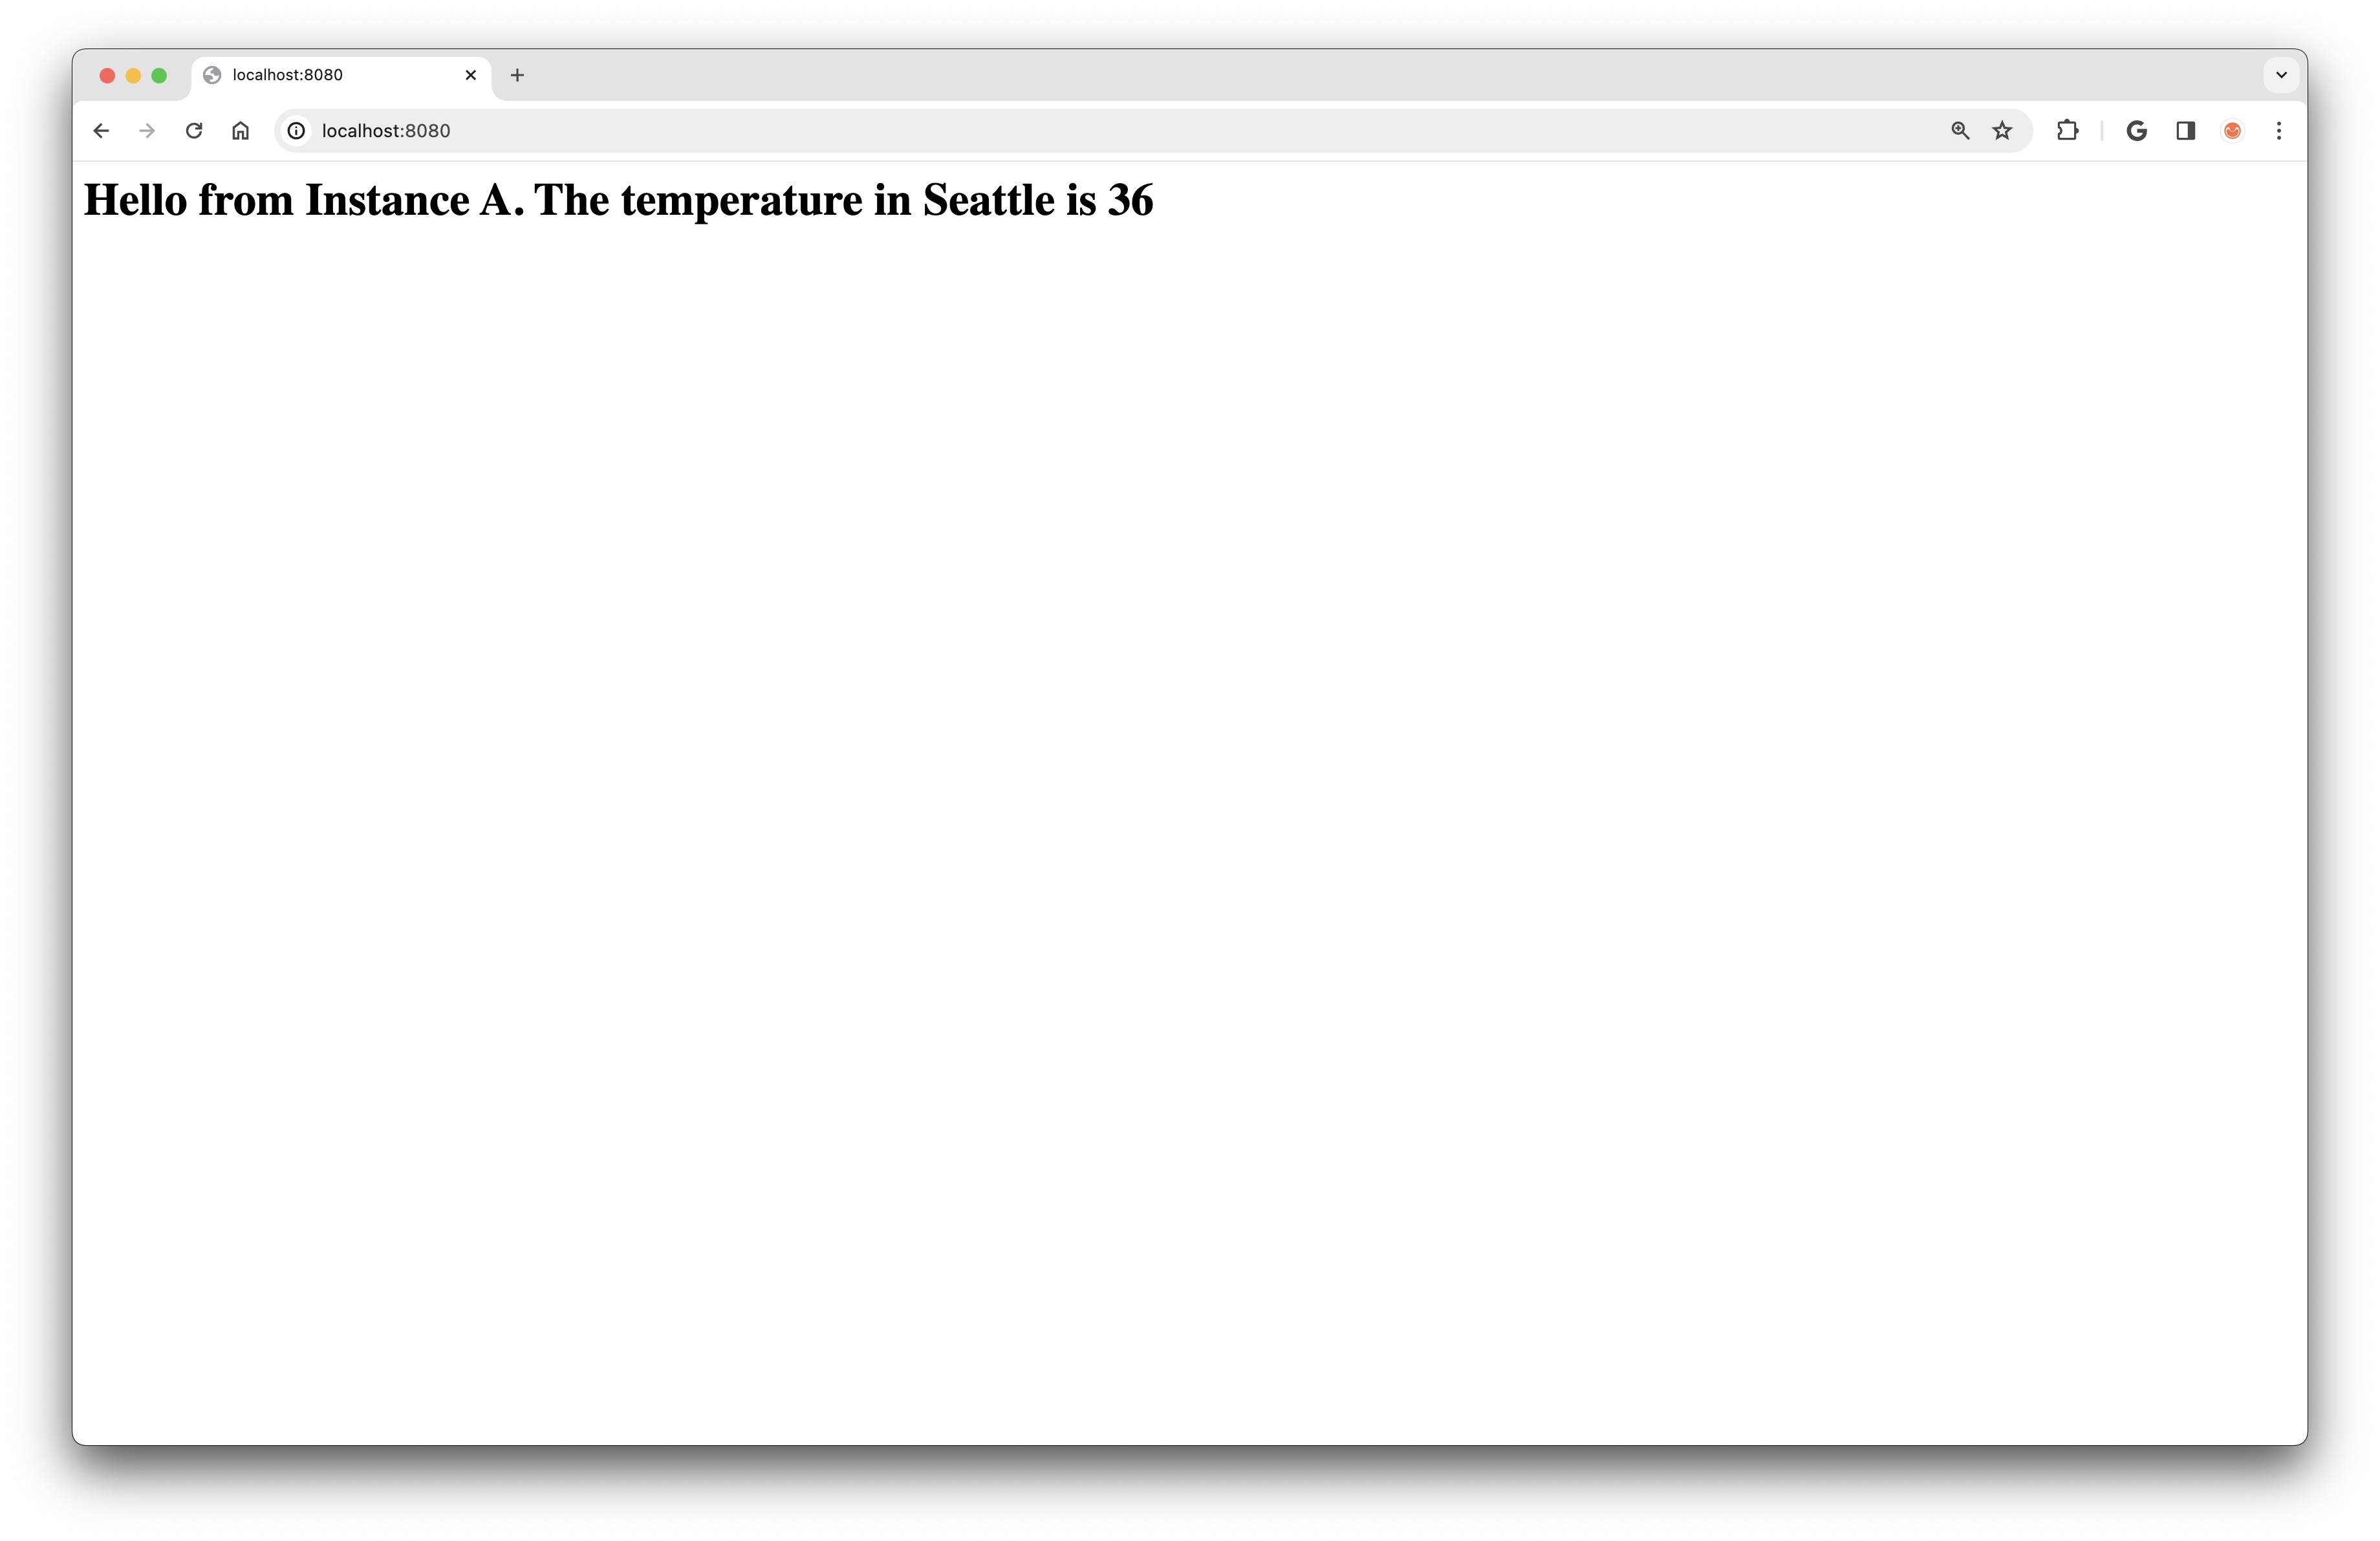
Finally, if we terminate and recreate Instance A, we will see that this time its user data script is able to reach the Internet and fetch the current temperature in Seattle.
With the NAT Gateway in place, the full picture of our VPC setup now looks like this, with Subnet B having bidirectional communication with the Internet, and Subnet A having outbound-only Internet access via the NAT Gateway in Subnet B:
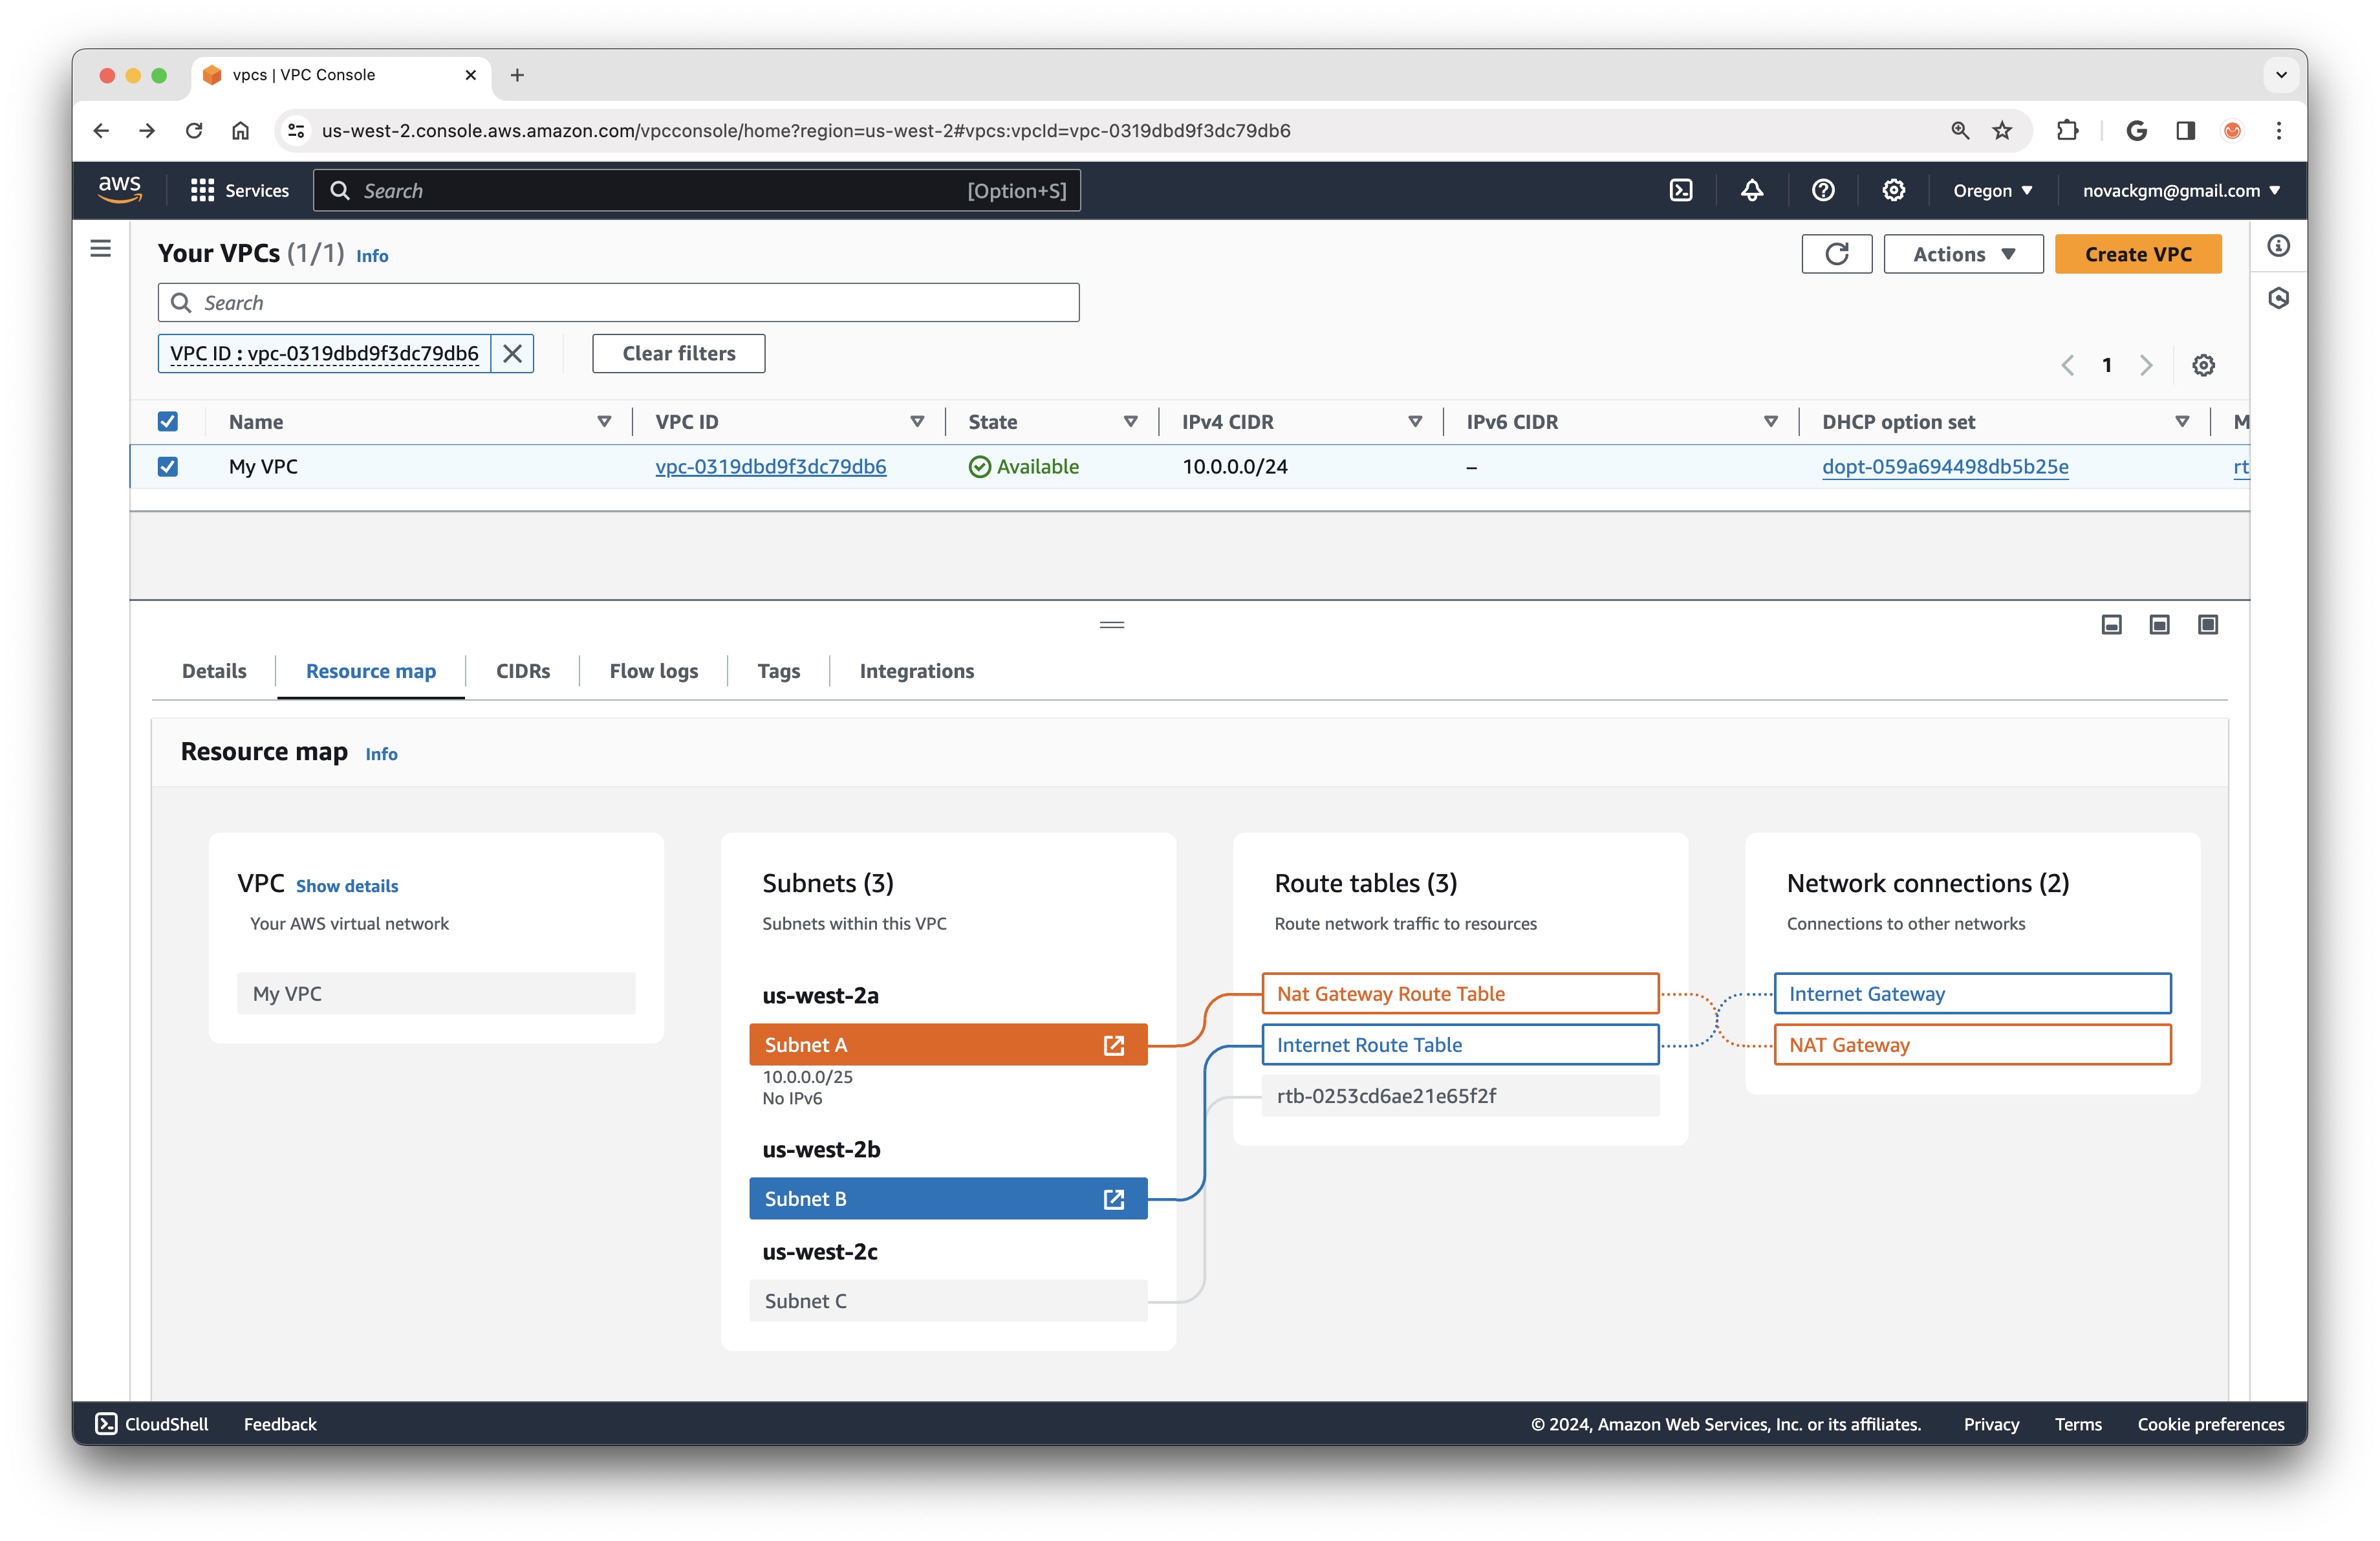
You can also find a nice visualization of these connections by looking at the VPC Resource Map in the AWS Console:
Wrapping Up
To keep this page digestible, I will end it here, having touched on the most fundamental resources in the AWS Networking landscape. In a future post, I would like to explore more concepts related to inter-VPC communication, such as VPC Peering and VPC Endpoints.
Thanks for reading 👋